Public Service Commission Preparation, Computer Operator, Blogspot and Wordpress Blogging, Qbasic Programming

bloggingblogging-beginnersblogging-how-to-startheadline

how to start blogging and make money? Complete Tutorial of creating Website with Blogspot.

Post Top Ad

Ms-Office Practical Guides

In this section, we present the learning materials for your computer practical exam especially in Ms-Office. Most important, frequently asked Questions, Practical Guides, Practice Sets, and Tips & Tricks from Ms-word, Ms-excel, Ms-powerpoint, Ms-Access and HTML for the practical exam preparation of PSC Computer Operator and Data Entry Supervisor. Let's started to learn.


Ms-Word

Practical Guides

Ms-Word

Asked Papers

Ms-Word

Practice Sets

Ms-Word

Tips & Tricks


Ms-Excel

Practical Guides

Ms-Excel

Asked Papers

Ms-Excel

Practice Sets

Ms-Excel

Tips & Tricks


Ms-Powerpoint

Practical Guides

Ms-Powerpoint

Asked Papers

Ms-Powerpoint

Practice Sets

Ms-Powerpoint

Tips & Tricks


Ms-Access

Practical Guides

Ms-Access

Asked Papers

Ms-Access

Practice Sets

Ms-Access

Tips & Tricks


Multiple Choice Questions Sets

Here we presents the selected, Most important, frequently asked Multiple Choice Questions from Ms-word, Ms-excel, Ms-powerpoint, Ms-Access and HTML for the written exam preparation of PSC Computer Operator and Data Entry Supervisor. Let's Get started to learn.


Ms-Word

MCQ Sets

Ms-Excel

MCQ Sets

Ms-Powerpoint

MCQ Sets

Ms-Access

MCQ Sets


HTML

MCQ Sets

Operating System

MCQ Sets


Interviews Preparations

The most important part of preparing for an Interview is practice. Preparation is the key to a successfull interview so take a look at Preparations Questions and Tips & Tricks how to answer them. Let's Get started to learn.


Interview Questions

Asked Before

Tips & Tricks

Based on Experience


Question Papers

I knew its hard to find the right question papers in internet from one website. But it's good to say here i collects questions papers sets that are previously asked from psc exams. These questions will be helpful for the final preparation of your exam. Let's start to expand your knowledge.


Section Officer

Asked Before

Computer Officer

Asked Papers

Nayab Subba

Asked Papers

Computer Operator

Asked Papers


Kharidar

Asked Papers

Asst. C.O.

Asked Papers


Modal Practice Paper Sets

Here we have writes some sample practical paper sets for your exam. Try to solve these questions within time at home frequently. If you solve this within time you will cover almost every quetions in exam hall. These questions will be helpful for the final preparation of your exam. Let's start to practice.


Section Officer

Modal Sets

Computer Officer

Asked Papers

Nayab Subba

Modal Sets

Computer Operator

Modal Sets


Kharidar

Modal Sets

Asst. C.O.

Modal Sets


Tutorials & Courses

In this section, we presents the learning materials for your Public Service Commission exam, bank exam, Nea exam, institutional exan etc. This section contains chapters with solutions, cources, or any thing that helps for your written exam, practical exam & interview based on curriculam. Let's start to prepare for your exam.


Section Officer

Tutorials

Computer Officer

Tutorials

Nayab Subba

Tutorials

Computer Operator

Tutorials


Kharidar

Tutorials

Asst. C.O.

Tutorials


Blogging & Wordpress Tutorials, Courses

In this place, you will find blogging tips, new strategies, and will teach you how to be a bogger with just the most basic computer skills. Everything you need to know to start blogging-we'll show you how step by step for blogging and wordpress. Let's Get started to learn.


Wordpress

Tips

Blogging

Tips

Wordpress

New Strategies

Blogging

New Strategies


Blogging

Make Money

Wordpress

Make money

Blogging

Guide

Wordpress

Guide


Blogging

For Beginners

Wordpress

For Beginners

Blogging

Tutorials

Wordpress

Tutorials


Wordpress

How to start?

Blogging

How to start?

Blogging

Intermediate

Wordpress

Intermediate


Post Top Ad

What is BlogSpot?

A blog is an online platform where you publish information every day or on a regular basis. On the blog, you can publish information related to your knowledge, ideas, and skills.

Blogs are not limited to this, but in today's world, blogs have become a source of education. Today, we read all the information and websites we search on in search engines like Google, Bing, and Duckduck Go. These are all blogs.

Today there are many platforms online where you can create your own blog. Some of the best platforms are WordPress, Blogger, Weebly, Wix and Constant Contact Builder.

Blogger-logo
People who regularly write articles on blogs are called bloggers. When he regularly publishes those articles on his blog, that process is called blogging. Bloggers regularly publish articles on their blogs. Making a blob about what you are good at can be easy and long lasting. When creating a blog, it is very important that you choose Niche (skills, art).

Note:- For your easiness, If you Need PDF file of this document in other languages (In Hindi or Nepali), plz comment in the comment section below.


What is Niche in Blogging?

Niche is the topic of your blog, what topic is your blog based on? You can also call the category of your blog Niche. Such as technology, education, career, etc. All these can be called Niches or Topic.

Most bloggers make the mistake of saying they don't know what Niche is interested in.

They start blogging on any topic. It's not a matter of one or two people. I'm telling all those bloggers who are all new here. They start working on virtually any Niche.

But new bloggers shouldn't do that. What is blogging for you in the first place? Complete information should be taken about this. You have to decide what to put Niche for your blog. What you are most interested in and what you know best. Once all of this has been decided, you should start a blog.

How to choose Niche for blog? 

In order to choose Niche for your blog, you have to pay attention to two things.

First: -

Which subject are you passionate about: - You should choose the subject in which you are most interested. You can better inform people about it and whether we get paid or not, we can continue to work on blogs to keep people informed. You just have to be more discriminating with the help you render toward other people.

Second: -

Whether the subject you have chosen is (niche) Profitable: - Check if the niche you have chosen has the following.

-Is this one of the most searched topics on the internet?

-Can You Make Money From It?

-Are there affiliate programs related to the topic you have chosen?

If you have chosen Niche with all these things in mind and you have chosen a topic with full knowledge, then you have chosen a useful topic for your blog.

Benefits of Blogging

As mentioned above, blogging is about creating a blog and writing articles on a regular basis. The benefits of blogging can be understood from the following points:

1) If your blog is very popular then you can earn money from your blog through various means like advertising and affiliate marketing.

2) If you have a small business, you can regularly blog about your products.

3) Blogging makes your writing better.

4) You can become very popular on the Internet.

5) You can share your knowledge with as many people as possible by writing a blog.

6) You can stand as an entrepreneur and reach the heights of success on your own.

7) In today's world, blogging is the best way to make money at home.

8) Every day is an opportunity to learn something new.

9) Gradually your skills begin to develop.

How to create a blog?

If you want to learn blogging and you have a small budget, it is a good idea to start with Blogspot.

You don't have to spend a penny on a free blog. You only have to pay up to 1000 rupees per year to register from blogspot custom domain name (.blogspot.com) to international domain name (.com).

Once you understand the general concept of blogging, you can invest in it again.

Blogger (Blogspot) is a product of Google.

If you have a Gmail account, you can start blogging.

How to create a website (Blog) using Blogspot?

Information website (Newspaper, Cultural, Tour & Travel, Food & Kitchen, Health & Fitness, Educational, Life & Beaty, Music & Video, Personal, Photography, Games etc). free). There is no charge for creating a website on Blogspot. The theme (template) for websites is provided free of charge by Blogspot. You can also download the theme (template) for free from the internet. All you have to do is pay for the top level domain (.com). With a little technical knowledge, you can make a good website at home by spending around 1000 thousand rupees annually.


How to create a newspaper website using blogspot for free? I have presented the entire method. See step by step.

Step 1: - Open any web browser on your computer.

Step 2: - Type blogger.com or blogspot.com in the web address bar and press enter button. 

.com/img/a/

Step 3: - Homepage of Blogspot opens. Then click on CREATE YOUR BLOG. 

.com/img/a/

Step 4: - Then you can login from Gmail or if you do not have Gmail ID you can create new Gmail ID and login to Blogger. Here I create my Gmail ID and login to Blogger.

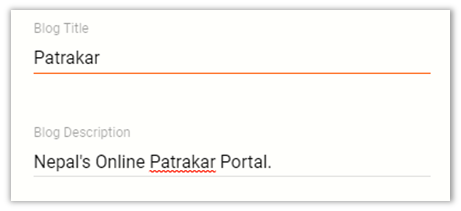
Step 5: - After creating Gmail account, your Blogger dashboard will appear. Now you have to keep the name of the blog. This is where your blogging begins. The name should be related to your niche, brand and unique.

.com/img/a/
Step 6: - You have to choose the URL. After using the URL you can open your website. It should be able to match your company and represent your company. URL should be simple, straightforward and unique. Then click on Next button.

.com/img/a/
Step 7: - Then write your own name to use to show people coming to your website. Click on the FINISH button. 

.com/img/a/

Step 8: - Now Blogger's dashboard opens in your browser. Initially, your blog is empty. Now you can write a post from here, create a page and design your website. 

.com/img/a/

This is how you successfully login to Blogger and open the Blogger Dashboard. You can open the website from the URL onlinepatrakar.blogspot.com to see what the website looks like. 

.com/img/a/

Initially the website is empty. Website theme (Template) can be changed as required. I will download and apply the template related to Newspaper for free from internet. Before that I have general information about the menu option on the left side of the Blogger dashboard.

Posts: - 

You have to write an article using this option to have content on your website. This will allow you to publish information related to your company on the internet through post.

Stats: -

It shows information about the traffic (people) visiting your website. For example, it shows information about how many people have visited your website today, yesterday, this month, last month, and how many people have commented.

Comments: -

From here you can read and reply to the comments made by people on your website.

Earnings: -

Here you can earn money. To do this, you need to link the website to a Google AdSense account. If you do not have a Google AdSense account, you can create and add one. If you have an account, you can add the website to the AdSense account. How to create an AdSense account, how to verify, how to add a website I will present in detail later.

Pages: -

From here you can create pages for the website. For example, you can create page according to introduction, contact, about, privacy policy and other requirements. Then you have to write the content on the page.

Layout: -

According to Blogger, you can design a website using a variety of gadgets.

Theme: -

From here you can change the theme of the website as per your requirement.

Settings: -

From here the basic setting of the website, Privacy, Permissions, Post, Comment, Email etc. are used to adjust the settings related to the need.

View Blog: -

You can view the website by clicking on View blog. You can also view the website by typing the URL you entered in the web address bar and pressing the enter button.

How to change the theme (template) of a website?

Theme determines the design of your website. Theme is a collection of Templates and Stylesheets. This includes things like color scheme, layout and style elements. Each theme comes with different design, layout and features.

Initially the default theme given by Blogspot is applied on your website. You can change the theme to suit your needs.

After placing the template, you have to post (Article, News) as well as design the front page of the website.

You can use the theme (template) provided by Blogger for free. The theme given by Blogger is simple and not very attractive. You can also download the theme from the Internet and use it on your website. The theme (Template) available on the Internet is very attractive and has many features.

Follow the steps below to apply the theme given by Blogger.

Step 1: - Login to Blogger.

Step 2: - After opening Blogger dashboard, click on Theme of menu option on left side. 

.com/img/a/
transparent

Step 3: - Then the list of themes given by Blogger for free appears. You can choose any theme according to your needs. Click on the theme. I click on the Notable light theme under Notable and click on the Apply button. .com/img/a/

Step 4: - Then the message New theme applied successfully appears on your screen. 

.com/img/a/

Step 5: - Then if you open your website, you can see that the theme of the website is updated. 

.com/img/a/
.com/img/a/

Due to lack of content (Post, Article) the website is empty. This way you can successfully put a new theme on the website. The above themes are provided by Blogger. But you can download the themes available for free on the internet and apply them on the website.

How to download free theme from internet and apply on website?

For this you have to search for the theme (template) from the internet and download it. Then apply the downloaded theme.

To download theme from internet: -

Step 1: - Open one of the web browsers (Google Chrome, Mozilla Firefox, Microsoft Edge) on your computer.

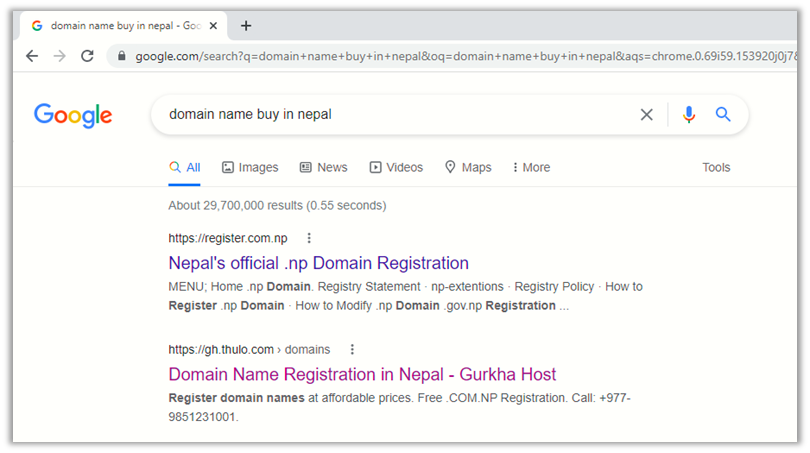
Step 2: - Type “Free blogger theme download” in the web address bar and press enter button. 

.com/img/a/

Step 3: - Then the posts of many sites appear. To view the free themes (templates) provided by the websites, open the websites one by one. I open the first list by clicking on the website https://gooyaabitemplates.com/. 

.com/img/a/
Step 4: - Then click on By Topics options in the Main Menu at the top of the website. Choose a theme related to your business, profession. Download themes related to Personal, Educational, Health & Fitness, Food & Kitchen, Movies, Photography, Games, Video, Fashion, Culture, Music, Cars & Motorsports, Nature, Cartoons, Animals, Business, Travels etc. Please

Step 5: - Click on the By Topics menu option at the top right of the website as shown in the picture below.

.com/img/a/
Step 6: - Since the website I have chosen is related to Niche Newspaper, I click on News. Then you see a list of your themes. Click on any one theme. Click on Preview to see the design of the template.

.com/img/a/
Step 7: - We can see the design and appearance of the theme through the Live Preview at the same time. To do this, click on the Live Preview button at the end of the open page.

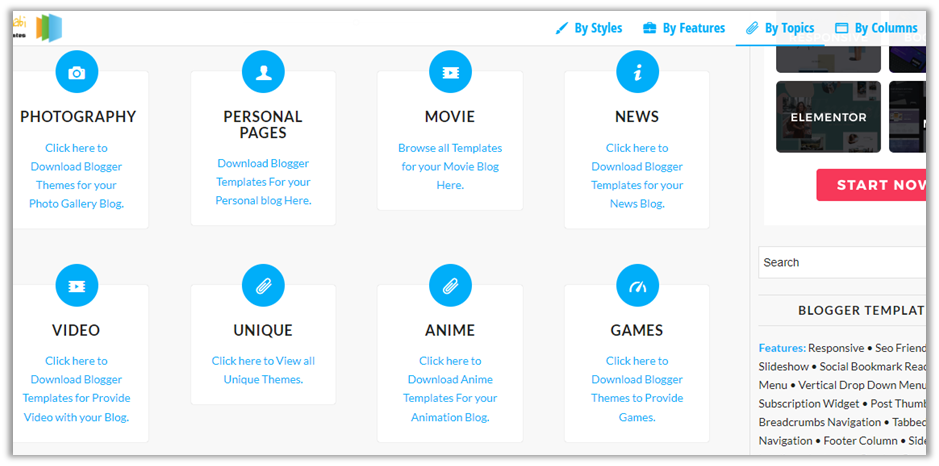
Step 8: - Then another page opens in the browser. The theme appears on that page. Check out everything in Theme. Well, now you can download the templates (Theme). If it doesn't meet your needs, you can still download other templates.

.com/img/a/
Step 9: - I will download another template "Sora Times".

Click the Download button at the beginning to download the template. 

.com/img/a/

Step 10: - After the template is downloaded, it is inside the download folder of the computer.

.com/img/a/
Step 11: - Open the window explorer and click on the Download option from the options on the left side. The Download folder opens. 

.com/img/a/

Step 12: - Then right click on the file as shown in the picture above. Click Extract to click on the displayed options. In that place, the folders and files inside the zip file are extracted. If you do not have an extractor, download WinRAR software from the internet.

.com/img/a/

Step 13: - Open the folder on the desktop. It contains many files. But what we need is an XML document. I copied the XML type document Sora Times and put it on the computer desktop.

.com/img/a/
Step 14: - So you have successfully downloaded the template related to your business according to your needs.

How to apply theme (template)?

Now you can apply on that theme website.

Follow the steps below to apply the template you downloaded on your website.

Step 1: - Login to Blogger.

Step 2: - After opening Blogger dashboard, click on Theme of menu option on left side.

.com/img/a/

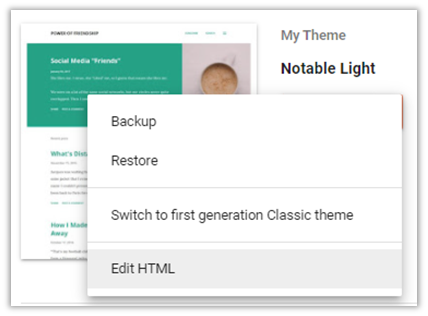
Step 3: - Then click on the image like Drop arrow that appears after Customize.

.com/img/a/

Step 4: - Then click on Restore option from the open options. 

.com/img/a/

Step 5: - Then click on Upload button as shown in the picture below.  

.com/img/a/

Step 6: - Now select the downloaded template file from your desktop and click on Open button. 

.com/img/a/

Step 7: - At the bottom left of the screen a message appears in the Restoring theme and then a message of the Restored theme appears.  

.com/img/a/
.com/img/a/

Step 8: - Open the website to see if the template is applied. You have successfully placed a new template on the website.

.com/img/a/

Now looking at your website is empty, the website should be decorated.

Now you have to add content to the website as well as change the design and layout of the website. First of all, I will post on the website. Then I will change the layout design of the website from the blogger dashboard. Unless there is content on the website, changing the design of the website at the beginning does not make the website understandable. So the best option is to post first and then change the design of the website.

How to write posts on website?

Now that you know some general information about Blogger Dashboard, you need to write a post. I have written the following steps for writing a post.

Step 1: - Click on NEW POST. 

.com/img/a/

Step 2: - Keep the title of the post. You can also put photos and videos in the post. Write information related to the title in the body. You can even format the text. Use the toolbar to increase the size of words (font), bold, italic, underline. 

.com/img/a/

Step 3: - Labels and permalinks play an important role in Post Settings in the right menu of Blogger dashboard. Labels define the category (attribute) of the post. For example, news can be defined in the categories of entertainment, sports, discussion, business, agriculture, information technology, local level special, interview, lifestyle, literature, international, story, etc. Therefore, when writing a post, it is essential to write the label name (category) related to the news. Category (label) is used to change the layout, design of a website. 

.com/img/a/

Step 4: - Permalink is the link to open the post. These two types are automatic and custom. Automatic permalink link closed automatically. You can customize it to your liking, which is called custom permalink. This makes it easier and faster to rank the link on the google search engine website or post. 

.com/img/a/

It is better to customize the link. In this you have to change the title of the post to English and write dash (-) between the words. You can even use a number. Such as

Title "Jumla produces 6,000 metric tons of apples" converted to English language "Jumla produces 6,000 metric tons of apples". Now type between the title in English using dash (-). Once a custom permalink has been created, it cannot be changed.

For that click on custom permalink. 

.com/img/a/

Step 5: - Then click on the publish button at the top right of the screen. 

.com/img/a/

Step 6: - Click on confirm to publish the post. 

.com/img/a/

Step 7: - Open the website and you will see the post published. To do this, open the website by clicking on the view blog at the bottom of the left side menu. 

.com/img/a/

Step 8: - Thus you successfully wrote the first post on the website. Click on the post to open it. This way you should write more posts related to your website.

How to put image in post?

Placing an image in a post increases the readability of the post and makes it look attractive. Follow the steps below to put an image or video in your post.

Step 1: - There is no image or video in the first post written above. Click on the post to open it.

.com/img/a/

Step 2: - Place the mouse cursor in the post where you want to place the photo. Then click on the Image option in the toolbar and click upload from computer. 

.com/img/a/

Step 3: - Then the Add Images dialog box opens. Click on Choose files. 

.com/img/a/

Step 4: - Select the photo you want to keep related to the post on the computer and click on Open button. 

.com/img/a/

Step 5: - After uploading, select the photo and click on Select button. 

.com/img/a/

Step 6: - Photo appears in your post body. If the photo is placed in the New Post, the Publish button appears. But since there is a photo in the post published here, you can update the post by clicking on the update button. 

.com/img/a/

Step 7: - After clicking on Update, a photo with text appears in the post on the website. 

.com/img/a/

This way you can even put video in the post. For that you can upload the video on the computer by clicking on the video option after the photo and put it in the post. 

.com/img/a/

Now that you have 20/30 posts on your website, you can modify the design of the front page of your website.

How to Setup theme (Template)?

After placing some posts on the website, now you have to change the layout, design of the website. The website is made up of different parts. Such as Top Menu, main & secondary menu, vertical menu, horizontal menu, header, footer, sidebar etc.

The default value in all of these should be changed to suit your needs. Follow these steps to change the layout in this template.

How to set Social Top layout  of website theme?: -

Step 1: - Login to Blogger.

Step 2: - Click on the layout menu option on the left side of Blogger's dashboard. 

.com/img/a/

Step 3: - Then you can change the design and appearance of your website through the tools in the layout. Search the Social Top tool. 

.com/img/a/

Step 4: - Click on Edit icon under Social Top widget. 

.com/img/a/

Icons Avaliables {facebook, twitter, rss, youtube, skype, stumbleupon, tumblr, vk, stack-overflow, github, linkedin, dribbble, soundcloud, behance, digg, instagram, pinterest, twitch, delicious, codepen, reddit, whatsapp, snapchat , email

Step 5: - After clicking on Edit icon, you should enter the address of the facebook page you created for your magazine. If you don't know how to create a facebook page yet, I have given you how to create a facebook page in the chapter Use of facebook. From there, follow the method to create a facebook page and put the address of the facebook page of your business in the URL. Then click on the save button. As seen in the picture below.

.com/img/a/

Step 6: - This way you can keep other social networking sites. Do the following for Twitter. Then click on the Save button. 

.com/img/a/

Step 7: - To add Instagram social networking site, copy the profile link of Instagram account and paste it in the site URL. Then click on the save button. 

.com/img/a/

Step 8: - You can also add other social networking sites. But here I am sharing the link of only 3 sites. Then click on the Save button. 

.com/img/a/

Step 9: - Click on the save button at the far right of the Dashboard. Then the sites URL is updated in the top menu of your website. Check the website by clicking on the top menu.  

.com/img/a/

Step 10: - Then I see the pictures of the three facebook, twitter and Instagram logo. Clicking on the logo will take you to social networking sites related to your business.

.com/img/a/

How to set Top Navigation/Footer Menu of this theme?

Step 1: - Search Top Navigation in Layout. 

.com/img/a/

Step 2: - Click on Edit icon under Top Navigation widget. 

.com/img/a/

Step 3: - As seen in the picture above, it seems necessary to create two links (page). About and Contact Us. On the About Us page you need to write about the general introduction of your magazine. The contact details of the newspaper should be kept on the Contact Us page.

To create About and Contact us page, do the following.

Step 1: - Click on Pages in the Left menu. 

.com/img/a/

Step 2: - Then the New Page option appears in the Left menu. Click on it. 

.com/img/a/

Step 3: - Keep the title of the page. On the body of the page you have to write about the general introduction of the magazine. You can put it according to your needs. 

.com/img/a/

Step 4: - After writing the details, click on Publish button. 

.com/img/a/

Step 5: - Then click on confirm button. 

.com/img/a/

Step 6: - Create another contact us page in the same way. It has to contain the contact details of the newspaper. 

.com/img/a/

Step 7: - Then you can see two pages are created. 

.com/img/a/

Step 8: - Now after creating two pages, click on the view button of those pages. 

.com/img/a/

Step 9: - The page opens. Copy the link https://onlinepatrakar.blogspot.com/p/contact-us.html in the web address bar as shown in the picture below. 

.com/img/a/

Step 10: - Click on Edit icon again under Top Navigation widget. Then click on the Edit this item button on the About page.

Step 11: - Paste the link of About Us page that you want to copy in the Site URL and click on Save button. 

.com/img/a/

Step 12: - Similarly copy the link of another About Us page https://onlinepatrakar.blogspot.com/p/about-us.html. 

.com/img/a/

Step 13: - Then click on Save button. 

.com/img/a/

Step 14: - In the same way, enter the address of the website in Home and click on Save button. 

.com/img/a/
.com/img/a/

Step 15: - Then click on Save button. 

.com/img/a/

Step 16: Click the Save button on the far right of the Blogger dashboard again. 

.com/img/a/

This way you have successfully updated the details even in Top Navigation.

.com/img/a/
How to set Main Menu / DropDown / Multi DropDown / Mega Menu?
Now we also have to change the Main Menu.
.com/img/a/
To do this, follow the steps below.
Step 1: - Search the Main Menu in the Layout of Blogger Dashboard.
Step 2: - Click on Edit icon under Main Menu. 
.com/img/a/
Step 3: - Normal Menu, Dropdown Menu and Dropdown menu need to be updated. 
.com/img/a/
Step 4: - First click on the edit this item in the Home link to update the Home menu. Type "homepage" in the site name of the website. Copy the homepage link of the website and paste it in the Site URL. Then click on the Save button. 
.com/img/a/
Step 5: - Then delete all the other links given by the theme and not needed. For that click on delete this item button. 
.com/img/a/
Step 6: - Now click on Add a new item to add another link. 
.com/img/a/
Step 7: - Enter the Site Name in Business and Site URL https://onlinepatrakar.blogspot.com/search/label/business and click on Save button. After the label in the site URL, you have to put the label (category) name corresponding to the site name you are putting. The Label (Category) Name is used when writing the post. 
.com/img/a/
Step 8: - Create other links as well. Keep adding the label (category) name associated with the link to the site URL. 
.com/img/a/
Step 9: - Then click on Save button. The home menu of the website appears to be updated.
.com/img/a/
How to set the Hot Posts layout of this theme?
To update the content (post) that appears after the main menu of the home page, do the following.
Step 1: - Search for Hot Posts in Layout of Blogger Dashboard.
Step 2: - Click on the Edit icon under Hot Posts. 
.com/img/a/
Step 3: - Put Main Headline in Title. Put the category (label) you want to show in the content. Such as business, sports, health, etc. I keep the business. It needs to be updated from time to time. 
.com/img/a/
As seen in the picture below, the Hot Post update appears after the Home menu.
.com/img/a/
How to set the Featured Slider layout?
To update the slider that appears after the main menu of the home page, do the following.
Step 1: - Search the Featured Slider in the Layout of Blogger Dashboard.
Step 2: - Click on Edit icon under Featured Slider. 
.com/img/a/
Step 3: - You can put the category (label) you want to show in the content. Such as business, sports, health, etc. I have 5 / recent / slider. 5 shows five posts in the slider, referring to the recent post. If you put 5 / Fashion / slider, it only shows 5 posts in slider and posts related to fashion category. It needs to be updated from time to time. 
.com/img/a/
This way you can update the slider.
How to set Featured Posts 01 and 02 Layout of theme?
To update the feature post that appears after the slider of the home page, do the following.
Step 1: - Search for Featured Posts 01 in Layout of Blogger Dashboard.
Step 2: - Click on the Edit icon of Music under Featured Posts 01. 
.com/img/a/
Step 3: - Put business in the title. I put 4 / business / feat-big in the content. 4 is 4 posts, busness is category, feat-big is the design type to show the posts.
Types can include any of feat-big, col-left, col-right, grid-big, grid-small. This is a feature provided by the theme (Template). 
.com/img/a/
In this way, you must update other gadgets under Featured Post 02.
For Agriculture: - agriculture / feat-big
For Health: - 3 / health / grid-small
For Sports: - 3 / sports / col-left
For Technology: - 3 / technology / col-right
For Interview: - 6 / interview / grid-small 
.com/img/a/
You can also easily update other Sidebar Gadgets.
How to change header logo of theme?
Step 1: - Search for the Header Logo in the Layout of Blogger Dashboard.
Step 2: - Click on the Edit icon of the Header under the Header Logo. 
.com/img/a/
Step 3: - If you want to change the Blog Title, you can add another one. Blog Description in "Nepal's Online Patrakar Portal." Can keep Then here you have to make the logo of the header. 
.com/img/a/
Do the following to create the header logo.
-Open Ms-word.
-Write "Nepali Journalist". Increase font size by selecting Font aprajita. Also bold and center. 
.com/img/a/
-Then we will put a border above and below the word.
-Go to the Border Tab under the Border and Shading dialog box. Click on Top & Bottom margin, select 3pt in width and click on OK button. 
.com/img/a/
-Choose red font color for Nepali characters. Now we will change the page to image (header logo) by screen shot. To do this, press the Prt Screen button on your computer.
-Open the Paint Program. 
.com/img/a/
-Press Ctrl + v button simultaneously. The screenshot image appears in your paint program. Now crop it. 
.com/img/a/
-Then press Ctrl + s button to save the file as a photo. 
.com/img/a/
Step 4: - After creating the logo for the header, now after uploading the logo click on upload image from computer, click on choose file. 
.com/img/a/
Step 5: - Then select the header logo file you just created and click on Open Button. 
.com/img/a/
Step 6: Click on save button after receiving the message Image successfully uploaded. 
.com/img/a/
Step 7: - Then click on save button of Blogger dashboard. 
.com/img/a/
This way you can successfully change the Header Logo of the Website as per your requirement.
.com/img/a/
How to change the social plugin on the website?
Step 1: - Search for the Social Widget in the Layout of Blogger Dashboard.
Step 2: - Click on Edit icon of Social Plugin under Social Widget. 
.com/img/a/
Step 3: - Then click on the edit this button under Facebook to keep the address of the Facebook page of your business. 
.com/img/a/
Step 4: - I don't have onlinepatrakar's facebook page yet so I will keep my personal facebook page here. The link to the Facebook page is as shown in the picture below. Copy it
https://www.facebook.com/bhattmohandutt 
.com/img/a/
Step 5: - Paste in Site URL and save. 
.com/img/a/
Step 6: - Keep up the good content with other popular social networking sites. Like twitter, Instagram, Youtube, Pinterest etc. Deleting unnecessary others. Finally click on the save button. 
.com/img/a/
The social plugin on your website is updated.
.com/img/a/
How to Update Subscribe Us on Website?
Step 1: - Search for Sidebar Right (B) in Layout of Blogger Dashboard.
Step 2: - Click on Edit icon of Subscribe Us under Sidebar Right (B). 
.com/img/a/
Step 3: - Then right click on the video you want to keep from your Youtube channel and click on copy embed code. 
.com/img/a/
Step 4: - <! - Copy & Pasted from YouTube -> After and before </div> paste the copied embed code and click on save button.
The embed code is as follows:
<iframe width = "1019" height = "573" src = "https://www.youtube.com/embed/7tksjcQDbmk" title = "YouTube video player" frameborder = "0" allow = "accelerometer; autoplay; clipboard- write; encrypted-media; gyroscope; picture-in-picture "allowfullscreen> </iframe>
.com/img/a/
There is no video update in the Subscribe Us seen on the website. This way you can successfully update the Subscribe Us as well.
.com/img/a/
Here's how to update the Technology category below Subscribe Us on the website?
Step 1: - Search for Sidebar Right (B) in Layout of Blogger Dashboard.
Step 2: - Click on the Edit icon of Technology under Sidebar Right (B). 
.com/img/a/
Step 3: - Then you can put any category you created while writing the post here. But I keep technology here. Then click on the save button. 
.com/img/a/
This way you can update the Technology category below Subscribe Us. 
.com/img/a/
If you constantly write posts and make a layout of the website then your website is ready.
This way the design of your website is completed successfully. The next step is to change your current onlinepatrakar.blogspot.com (cutom domain) name to .com.
How to switch from onlinepatrakar.blogspot.com (cutom domain) to .com?: -

For this, three things have to be done. The first task is to purchase .com (top level domain name), the second is to set up the dashboard of blogspot and the third is to update the domain name servers on the website where the domain name was purchased. I will show all the steps step by step experimentally.

First task: - Top level domain name purchase task. To do this, follow the steps below.

Step 1: - Open the web browser (Google Chrome, Mozilla Firefox, Microsoft Edge etc) on the computer.
Step 2: - Type "domain name buy in Nepal" in the web address bar and press enter button.
.com/img/a/
Step 3: - You can open any website and register a domain from an organization working in Nepal. I will open the website of gh.thulo.com here. 
.com/img/a/
Step 4: - The website of the organization opens as seen in the picture below. Enter the domain name you want to get in the search field of the website and click on the search button. I register the patrakarnp.com domain name. 
.com/img/a/
Step 5: - Domain name is not purchased by any other person / organization "Congratulation! Patrakarnp.com is available!" The message appears. If purchased, the message "patrakar.com is unavailable" appears. At that time, choose another domain name and click on Add to Cart button. 
.com/img/a/
Step 6: - Then Cart's "Checkout" message appears. Click on it. 
.com/img/a/
Step 7: - If you need DNS Management and ID protection then check on both buttons and click on Add to Cart button. Then click on the Continue button at the end. But you can also take advantage of DNS Management and ID protection. Click on the Continue button. I do not take advantage of both. 
.com/img/a/
Step 8: - Then click on checkout button. 
.com/img/a/
Step 9: - Now you need to create a login account. Fill in your personal details as shown in the picture below. 
.com/img/a/
Step 10: - Enter a complex but memorable password in the Password field. Choose a payment method to pay. I chose Esewa Payment Gateway, you can also choose other payment method you have.
Then check the I have read and agree to the Terms of Serve and click on the Complete Order button.
.com/img/a/
Step 11: - Then comes Invoice. You can download and print the invoice and save it. 
.com/img/a/
You can also change the payment method from here. For that go to the dropdown list of Payment Method. You can also pay by contacting Gurkha Host Company. 
.com/img/a/
If you choose Bank Transfer as shown in the picture below. In this case, you can contact the company and deposit a voucher of the same amount in the bank. But now I pay using online esewa method. For that 
.com/img/a/
Step 12: - Click on Pay Now button to make money. 
.com/img/a/
Step 13: - Then Esewa's website opens. eSewa Account eSewa ID and Password Now click on Login button. 
.com/img/a/
Step 14: - Then the money in your account also appears. Now click on Continue Payment button. 
.com/img/a/
Step 15: - Then click on Confirm button. 
.com/img/a/
This is how you successfully purchased a domain name. Messages appear along with your email and the company's website.
Website message: - 
.com/img/a/
Email message: - 
.com/img/a/
Then click on continue to client area to see the domain's dashboard on the website.
How to Link to lekhante.com purchased onlinepatrakar.blogspot.com (cutom domain): -

Step 1: - Click on the setting of Blogger Dashboard.
Step 2: - Click on the custom domain option under Publishing. 
.com/img/a/
Step 3: - Enter the domain name “lekhante.com” that you have purchased and click on save button. Then the information is shown as shown in the picture below. 
.com/img/a/
Note: - Both of these records may be different for you. Save the record to your computer immediately and only add it to the cpanel of the website you purchased the domain name from.
Step 4: - Now you have to do DNS management of the domain name. So login to the website that bought the domain.
Step 5: - To login to the website where we have purchased domain name, type https://gh.thulo.com/ in the address bar of web browser and press enter button. 
.com/img/a/
Step 6: - Click on the Client login button at the top right of the website. 
.com/img/a/
Step 7: - Enter email and password and click on login button. Use the email and password you keep when purchasing a domain. 
.com/img/a/
Step 8: - Click on Domains as shown in the picture below. 
.com/img/a/
Step 9: - Then click on the active status of the seen domain name. 
.com/img/a/
Step 10: - Click on Addons option under the manage option in the left menu. Buy both ID Protection and DNS Host Record Management and click Manage DNs Host Record Management. Both are free. It is possible to link domain name using DNS. 
.com/img/a/
Step 11: - Now you have to add the records given by two Blogger dashboards.
As shown in the picture below, two records can be understood as follows.  
.com/img/a/
Note: - After adding these two records to the cpanel of the website, don't forget to click on the save button as shown in the picture above on the blogger dashboard.

Ist Cnames:

Name: www
Destination: ghs.google.com

2nd Cnames:

Name: bzzftql6ij2l
Destination: gv-kynppxl52os6tj.dv.googlehosted.com

Step 12: - To add the first record in the cpanel of the website you have purchased both of the above records, select the cname from the Record Type, paste www in the host name and ghs.google.com in the address and click on save changes button. 
.com/img/a/
Step 13: - To add second record, select cname from Record Type, paste bzzftql6ij2l in Host name and gv-kynppxl52os6tj.dv.googlehosted.com in address and click save changes button. 
.com/img/a/
Step 14: - Then click on Redirect domain under publishing option. 
.com/img/a/
This way you can successfully link from onlinepatrakar.blogspost.com (Custom domain) to lekhante.com (Top level domain). You can also link to another .com domain name you purchased. Now after the DNS update, if you open www.lekhante.com, the website created in blogspopt will open. But it can take 24 hours or even a few days.
.com/img/a/


No comments:

Post a Comment

Post Bottom Ad